Windows ML: using ONNX models on the edge
Source Code for this example is available on GitHub: https://github.com/sbaidachni/uwp_onnx_example
Open Neural Network Exchange (ONNX) is a new open-source project that should help people to use neural network models across different machine learning frameworks. Microsoft started to talk about ONNX just last October, but frameworks like CNTK, Caffe2, PyTorch already support it and there are lots of converters for existing models including a converter for TensorFlow. Additionally, Microsoft included ONNX support to Universal Windows Platform, and it’s exactly that what I am going to discuss today.
To create a basic UWP application I need a model first. It’s possible to download an existing ONNX model from the following repository, but I decided to train my own model. Right now, we are doing a series of Machine Learning OpenHacks where people have to pass some challenges and learn lots of stuff about different machine learnings frameworks and algorithms. The simplest challenge in the list is creating a classification model using Microsoft Custom Vision Cognitive Service. Usually cognitive services don’t allow you to download your trained models, but Custom Vision does!
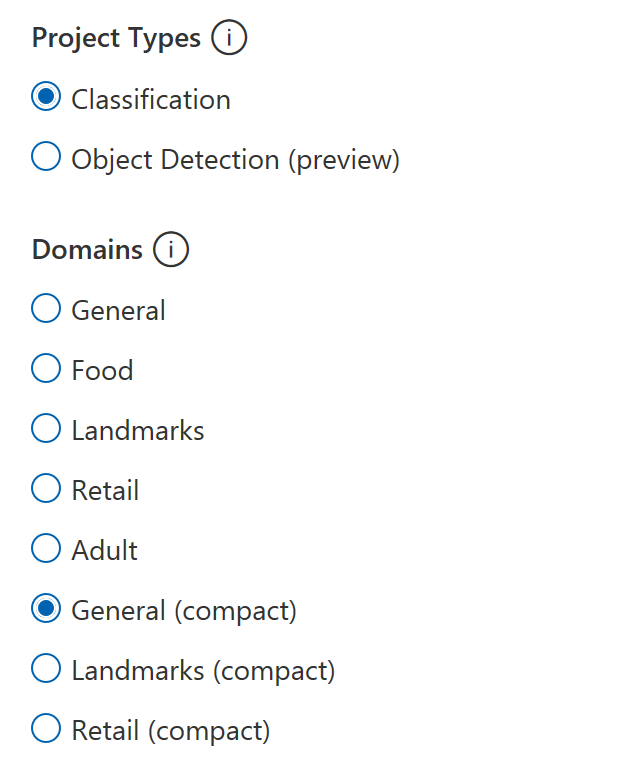
If you want to create an exportable model the Custom Vision service provides three options that are marked as compact. For my experiment I selected just General one:
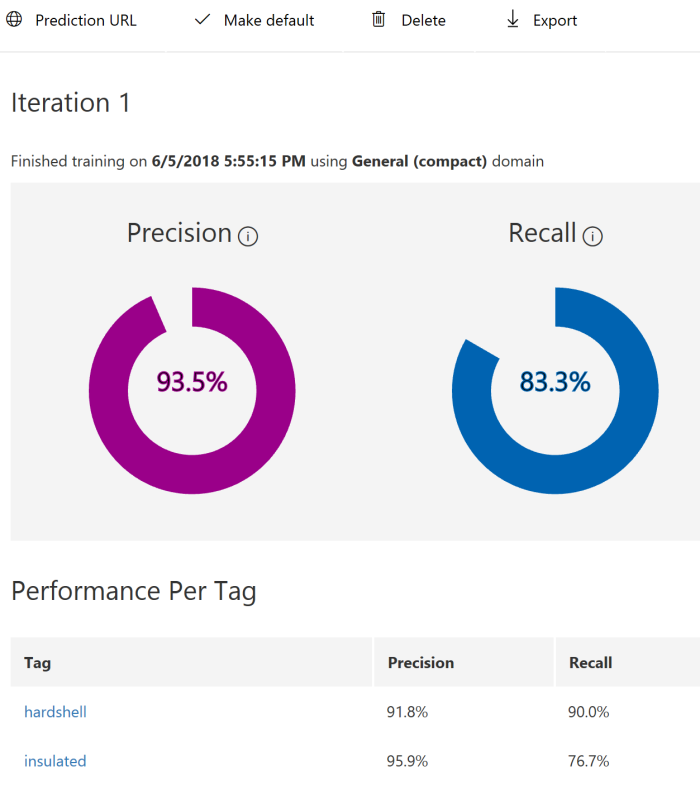
Our OpenHack dataset contains thousand images, but Custom Vision can be trained even if you have just 5 images per category. I picked two categories from the dataset: hardshell jackets and insulated jackets and uploaded 60 images per category. If you want to create a model yourself, you will be able to find all initial images on github.
To train a custom vision model you just need to click the Train button. I got good enough results even on the first iteration:
Now, it’s possible to export model. The Custom Vision service supports several formats for the model including ONNX one:

Once model is exported we can start developing a new UWP application. Don’t forget to make sure that you use the latest SDK (Build 17134) to create the application. Exactly this release contains Windows ML implementation. It’s still in preview, but you should not install anything to see integration with ONNX.
Once the application is created, you can add the generated ONNX model to the project. On this step Visual Studio will recognize ONNX and call mlgen tool to generate three proxy classes for your model: two classes to describe input and output data and one more to create the model itself. Probably, you will need to rename class names because mine were too long and contained lots of garbage, but it’s not a problem.
Let’s look at Input and output classes:
public sealed class JacketModelInput
{
    public VideoFrame data { get; set; }
}

public sealed class JacketModelOutput
{
    public IList<string> classLabel { get; set; }
    public IDictionary<string, float> loss { get; set; }
    public JacketModelOutput()
    {
        this.classLabel = new List<string>();
        this.loss = new Dictionary<string, float>()
        {
            { "hardshell", float.NaN },
            { "insulated", float.NaN },
        };
    }
}
You can see that to send an image to the model I need to convert it to a video frame. It’s possible to do using BitmapDecoder and SoftwareBitmap classes. The class for output data contains a Dictionary that already has two my tags from Custom Vision service. So, I can look at the dictionary and get my probabilities once a new image is evaluated.
The model class is pretty simple as well:
public sealed class JacketModel
{
    private LearningModelPreview learningModel;
    public static async Task<JacketModel> CreateModel(StorageFile file)
    {
    . . . . .
    }
    public async Task<JacketModelOutput> EvaluateAsync(JacketModelInput input)
    {
        . . . . .
    }
}
You can see that there are just two methods. The first method is static and allows you to get a file with ONNX model and create an instance of the class. The second method evaluates our data and generates result utilizing classes for input and output data.
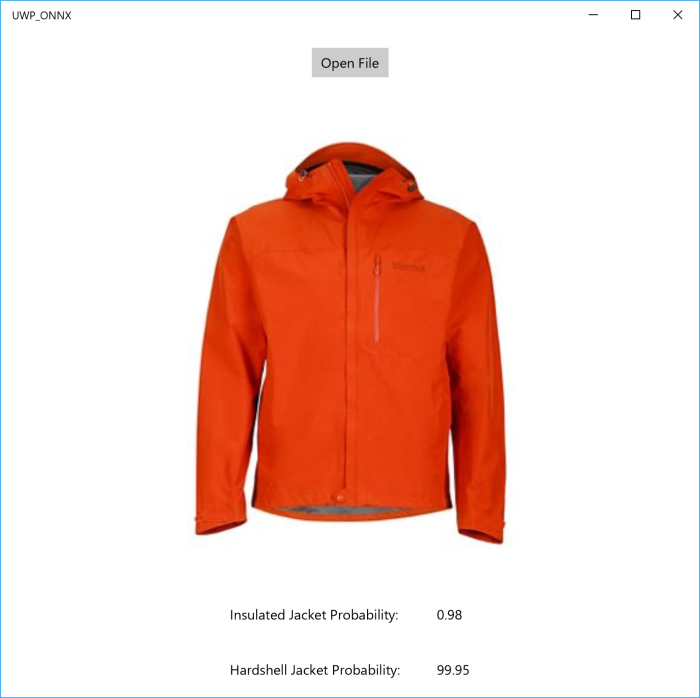
To show how to use all these classes above I created a very basic interface with a button, image element and couple text fields, and very basic logic:
JacketModel model;

protected async override void OnNavigatedTo(NavigationEventArgs e)
{
var appInstalledFolder =
     Windows.ApplicationModel.Package.Current.InstalledLocation;
       var modelFolder=await appInstalledFolder.GetFolderAsync("Models");
       var modelFile = await modelFolder.GetFileAsync("jacket_model.onnx");
       model = await JacketModel.CreateModel(modelFile);
       base.OnNavigatedTo(e);
}

private async void Button_Click(object sender, RoutedEventArgs e)
{
       var picker=new FileOpenPicker();
       picker.FileTypeFilter.Add(".jpg");
       picker.FileTypeFilter.Add(".jpeg");
       picker.FileTypeFilter.Add(".png");
       var file = await picker.PickSingleFileAsync();
       if (file!=null)
       {
           using (IRandomAccessStream fileStream =
              await file.OpenAsync(Windows.Storage.FileAccessMode.Read))
           {
              var decoder = await BitmapDecoder.CreateAsync(fileStream);
              var software_bitmap = await decoder.GetSoftwareBitmapAsync();

              WriteableBitmap bm =
                new WriteableBitmap((int)decoder.PixelWidth,(int)decoder.PixelHeight);

              software_bitmap.CopyToBuffer(bm.PixelBuffer);
              imgFile.Source = bm;

              var frame = VideoFrame.CreateWithSoftwareBitmap(software_bitmap);
              var evalData = await model.EvaluateAsync(new JacketModelInput()
                { data = frame });
              insulated_prob.Text = (100*evalData.loss["insulated"]).ToString("N2");
              hardshell_prob.Text = (100*evalData.loss["hardshell"]).ToString("N2");
           }
       }
}
There are two methods only. OnNavigatedTo just create an instance of the model using the ONNX model file that I included to the project (I don’t know why I didn’t use StorageFile.GetFileFromApplicationUriAsync method rather than three lines of code, but this approach works as well). The second method is an event handler. Once you select an image, it will be read to a SoftwareBitmap instance and the last one will be converted to a VideoFrame.
Done!
The final interface looks like this one:
So, thanks to ONNX and Windows ML we can create applications that use Machine Learning power on the edge.
Detecting objects using Custom Vision service
Last year, I had a chance to participate in a project that we developed together with InDro Robotics team. Our primary goal was to build a machine learning solution that could be used to rescue people on the water. Just imagine an army of drones that can fly under the ocean and notify the rescue service once any issue is recognized. You can find more details about the project in the following articles:
https://blogs.technet.microsoft.com/canitpro/2017/05/10/teaching-drones-to-aid-search-and-rescue-efforts-via-cognitive-services/
https://enterprise.microsoft.com/en-ca/customer-story/industries/public-sector/public-safety-national-security/indro-robotics-revolutionizes-search-rescue/
Working at this project we could build our own model using [CNTK] (https://www.microsoft.com/en-us/cognitive-toolkit/) as well as use a private preview of Custom Vision cognitive service that was moved to public preview shortly after we finish our project.
At that time the Custom Vision service could just classify images rather than detect or identify a particular object. Additionally, there were some requirements regarding to image background and the object appearance, but we found that the service worked pretty well in a “closed” environment like ocean where we have the same background. It could classify images even better than our custom model.
The most important challenge there was inability to build custom rules using the service. For example, the service could return that there is a life-vest and a boat on an image, but it was not clear if we have a life-vest on the boat or in the water. In the first case there is nothing strange, but the second one requires an operator attention (probably, something happened to the boat and people are floating around – you might watch Titanic to encourage your imagination there😊).
But it was exactly one year ago. Since that time Microsoft added some cool features to the service including object detection features. So, I decided to find some images from our InDro project and see how it works.
To start working with Custom Vision service you need to login to https://www.customvision.ai portal and sign-in using any Microsoft ID account. No Azure Trial or credit card are required – just login and start create a new project.
Custom Vision supports great API and some SDKs for different programming languages. For example, there is C# and Python tutorials that you can use to create a project, upload images, train your model and make predictions programmatically, but for this short experiment I decided to use just the portal. So, to create a project just click New Project button and activate the dialog below:

If you already have experience with Custom Vision, you will be able to see a new option Object Detection there. It’s exactly what we need to use: just choose Object Detection and upload some images using interface.
Because we are not classifying images anymore but detecting particular objects we need to provide more information about our objects tagging them. It’s possible to do directly on the portal. You can filter all untagged images and provide tags one by one:

This is the most complex step, but the Custom Vision service can start building a model once you have at least 15 tagged objects per tag. So, you can use few images only.
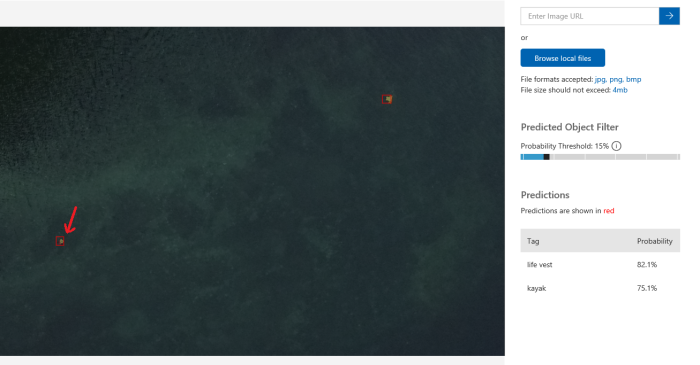
In my case, I uploaded 28 images with 25 kayaks and 17 life-vests there. I had much more images (of course, more is better), but I wanted to see results for a small subset. So, I clicked Train button and got my model in 60 seconds. The result is very surprised me:
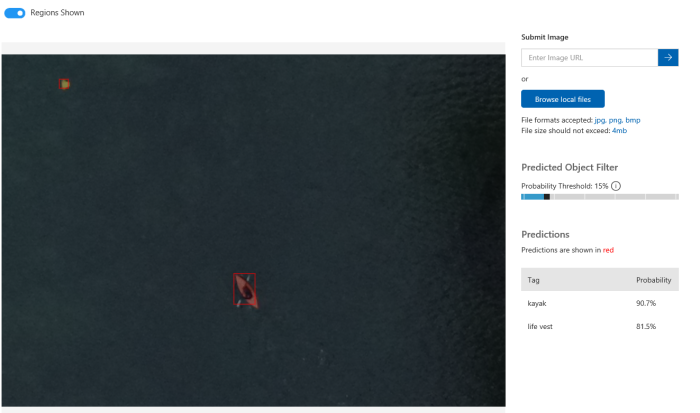
I even could find a life-vest that I could not recognize like a life-vest myself:
Of course, there are some room for improvement. For example, you can upload more images per tag as well as answer some questions like if you want to recognize a life-vest that is on a person who is sitting in a kayak. But even on the first iteration the service produces good results and you should not be an expert in Machine Learning.
One more thing that I want to note is how to start working with Custom Vision programmatically. In the beginning I mentioned couple tutorials, but all of them assume that you already have prepared images with marked boxes. So, you need a tool that helps you generate your dataset in the right format. And there is a tool: https://github.com/Microsoft/VoTT. Initially this tool was built for CNTK, but now it supports YOLO format, TensorFlow Pascal VOC and Custom Vision. In the case of Custom Vision, the tool will create a new project and upload all images, tags and boxes there.
Pay attention that for Custom Vision export you need to provide a training key rather than a directory:
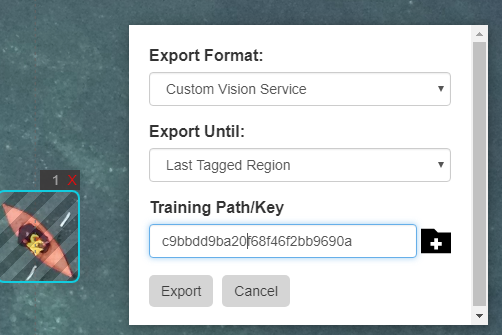
Your training and prediction keys are available on customvision.ai. Just click the Settings button in top-right corner of the portal.
If you want to use existing project some JavaScript coding skills are required. The Visual Object Tagging Tool is open source. So, you can simply find the following file lib/detection_algorithms/custom_vision/exporter.js and modify it a little bit (check vott_export name and tag creation procedure).
Using ML.NET to have a safe trip on Titanic
GitHub url: https://github.com/sbaidachni/MLNETTitanic
Couple years ago, I participated in a series of events for students, where we made some demos about Machine Learning Studio. The centerpiece of the demo was a model that could help make prediction about your chance to survive on Titanic. The datasets to build the model are still available on Kaggle, and you can download them using the following link: DataSets. That’s why, when Microsoft announced a new machine learning library for .NET developers, I decided to start playing with it using exactly the Titanic datasets. Let’s do it together.
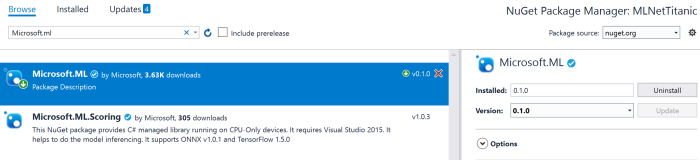
ML.NET is an open-source and cross-platform framework for .NET developers. It means that you can use it on Windows, Mac, Linux platforms utilizing .NET Core power, but it should also work on .NET Framework. For my demo I am going to use exactly .NET Framework, because I found that package installation is more challenging there compare to .NET Core. So, let’s create a basic Console application and use NuGet package manager to add Microsoft.ML package to the project:
I am going to use the latest stable release to simplify my post, but you can clone GitHub repository and build all needed assemblies from the source. I would recommend to use this approach if you want to get access to all new features. Looks like that many developers are contributing to the project right now to make a product that is too close to Microsoft internal machine learning library. For example, the current version (0.1.0) doesn’t allow you to split a dataset for training/testing parts and integrate it to a pipeline. It’s possible to split, but you need to go one level down rather than use high level Pipeline API. At the same time, if you compile the latest version of the library you will be able to see that there is an improvement regarding to cross-validation in the pipeline that is implemented already and it should be available in the [next release] (https://github.com/dotnet/machinelearning/issues/6).
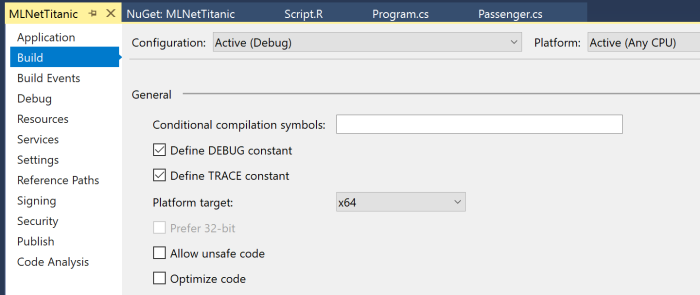
Adding the Microsoft.ML package to .NET Framework project you will need to make sure that your current platform is 64-bits. ML.NET doesn’t work on 32-bits (at least, right now), and to avoid any issues you can use Project Properties (Build tab) to choose the platform explicitly:
Working in .NET Framework environment I found couple small issues (not reproduced for .NET Core). The first one is System.ValueTuple assembly that was included to my project, but for .NET Framework 4.7.1 projects all tuple related functionality already included to mscorlib. So, if you use tuples, you will need to remove this library manually. The second problem is related to two native libraries CpuMathNative.dll and FastTreeNative.dll. Both libraries were copied to my solution folder, but Visual Studio cannot see them by default. The simplest way to fix the problem (you will have a runtime exception) is just copied both libraries to bin folder with your application. If you create .NET Core application rather than .NET framework it just works without modifications above.
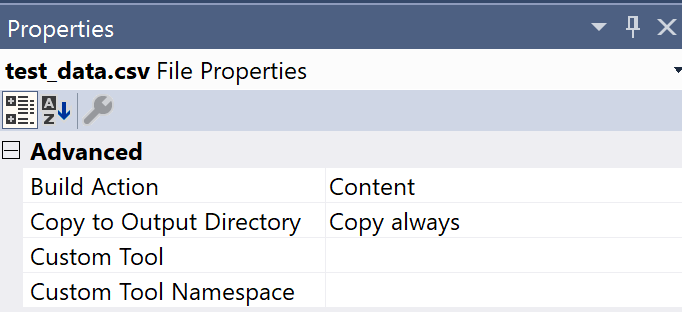
Finally, we need to prepare train and test datasets. You need to download just train.csv dataset from Kaggle. They have test.csv, but this dataset doesn’t contain labels and should be used to participate in Kaggle competition (to predict labels using your model and send results to Kaggle). So, we will need to split train.csv to have some data for evaluation. As I mentioned earlier, splitting is not integrated with pipeline in 0.1 version. So, I use a simple R script to make this task (included to the solution as a separate project). Once you have train/test sets you can place them anywhere and use absolute paths or include them to the project. If you included the sets to the project, don’t forget to change file properties to copy both of them to your application folder:
Ok. Let’s start coding.
ML.NET contains the TextLoader class that allows you to read data from csv files. But it’s not just a stupid text reader. Thanks to TextLoader you can make conversion, rename columns and drop some of them on fly. The Titanic dataset contains 12 columns (their descriptions on Kaggle) and I strongly believe that PassengerId and Name columns cannot affect my model. The PassengerId column is just a row number in our dataset. Obviously, this number in our dataset would not help people to survive. Name doesn’t help to survive as well. So, I decided to drop these columns since the beginning. At the same time the dataset contains a very important column called Survived. This is our label, and I need to rename it to Label, because Label and Features are default names for ML.NET pipeline. In order to describe all these changes to TextLoader, we need to define a class. Below you can find an example of this class:
public class Passenger
{
    [Column(ordinal:"1", name:"Label")]
    public bool Survived;

    [Column(ordinal: "2")]
    public float Pclass;

    [Column(ordinal: "4")]
    public string Sex;

    [Column(ordinal: "5")]
    public float Age;

    [Column(ordinal: "6")]
    public float SibSp;

    [Column(ordinal: "7")]
    public float Parch;

    [Column(ordinal: "8")]
    public string Ticket;

    [Column(ordinal: "9")]
    public float Fare;

    [Column(ordinal: "10")]
    public string Cabin;

    [Column(ordinal: "11")]
    public string Embarked;
}

public class PredictedData
{
    [ColumnName("PredictedLabel")]
    public bool IsSurvived;
}
You can see that there is the Column attribute that allows us to define the column name and specify its position in the dataset. There are three data types: bool, string and float. Potentially, I could use int for some columns, but ML.NET doesn’t support this data type now.
One more class that I defined above is PredictedData. This is a container that we are going to use making prediction. In our case we have just two-class classification task. So, I could use bool. Additionally, I applied the ColumnName attribute to make sure that ML.NET will recognize the field to store predicted values.
Before to start training our model we need to prepare data first like clean missing values, convert string columns to numeric vectors and so on. What is more important, once you train your model on your prepared data, you will need to do the same transformations with testing dataset and all data that you are using to make predictions. That’s why modern frameworks allow developers to combine a model parameters and pipeline information inside the model. Using this approach you can load the model, pass initial data and the model will preprocess them “automatically” before make prediction. To build own pipeline in ML.NET we can use the LearningPipeline class.
var pipeline = new LearningPipeline();
This class allows us to combine all preprocessing steps prior the training and include all these steps to the model. Below you can find and example of a pipeline for our dataset:
pipeline.Add(new TextLoader(trainSetPath, useHeader: true, separator: ","));

pipeline.Add(new ColumnDropper() {Column=new string[] {"Cabin","Ticket"} });

pipeline.Add(new MissingValueSubstitutor(new string[] { "Age" })
    { ReplacementKind=NAReplaceTransformReplacementKind.Mean });

pipeline.Add(new CategoricalOneHotVectorizer("Sex", "Embarked"));

pipeline.Add(new ColumnConcatenator(
    "Features", "Age","Pclass", "SibSp","Parch","Sex","Embarked"));

pipeline.Add(new FastTreeBinaryClassifier());
You can see that we need to start with a TextLoader to have some data for preprocessing and training. After that I decided to drop two more columns to save some space in computer memory. Both columns Cabin and Tickets contain some random text and I don’t have any ideas how to utilize these fields.
Right after that I decided to clean Age field. This column contains many missing values, but it’s not wisely to drop all rows where Age is missing, because I will not have enough data to train/test my model. So, I replace all missing values with mean. You can drop this column at all and see difference.
One more step is converting text categorical fields to one hot numeric vectors. I used CategoricalOneHotVectorizer and added it to the pipeline.
Finally, we need to concatenate all numeric columns to just one called Features. It’s a default name like Label. Once it’s done I can add a classifier. In this case I used fast tree, but there are couple more to make some experiments.
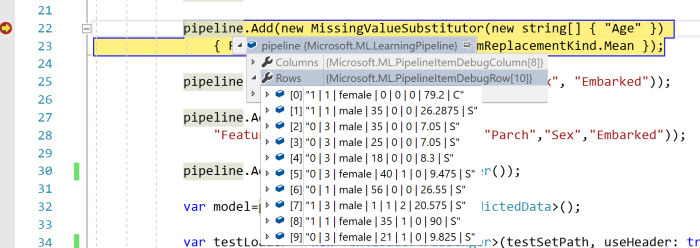
The LearningPipeline class is optimized for debugging, and if you run the code above, you will be able to see how your data is transforming on each step:
Now, I can train my model using defined above pipeline. This step is not challenging at all:
var model=pipeline.Train();
Once model is trained, you can save it to your disc using WriteAsync, load from the disk using LoadAsync or start making predictions using the Predict method. But I still want to evaluate my model. In order to do it we can use the BinaryClassificationEvaluator class and one more TextLoader to load our test dataset:
var testLoader = new TextLoader(testSetPath, useHeader: true, separator: ",");

var evaluator = new BinaryClassificationEvaluator();

var metrics=evaluator.Evaluate(model, testLoader);
Below you can see some data from metrics object:
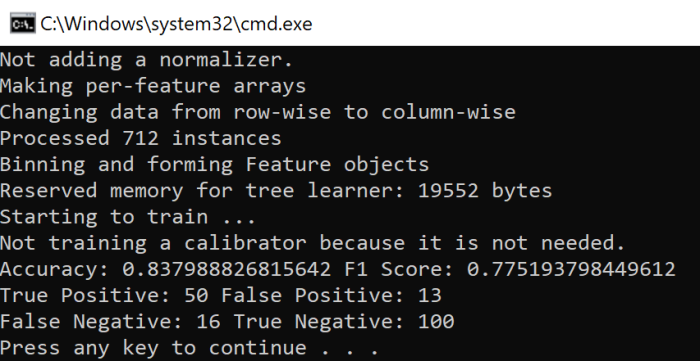
So, you can see that accuracy and F1 Score is pretty good and we still have some room for improvement. For example, we can make our training using the full training dataset and use cross-validation approach for evaluation, we can provide some parameters to the classifiers, we can improve Age cleansing procedure and so on. In any case, you can see that our code is not complex at all and you can make lots of experiments just tuning parameters.
If you are interested in ML.NET, I would recommend to clone the project from GitHub to use the latest updates. Good luck with your experiments.
How to cook Azure Mobile Apps (node.js): “50 records” limit and lazy loading
Code is available here: https://github.com/sbaidachni/XamarinMobileAppsDemo
In the previous posts we discussed how to create and setup node.js Azure Mobile Apps backend and how to start using .NET Standard libraries with Xamarin applications. Now, I am waiting for my next flight, and it’s time to build a basic interface using Xamarin.Forms.
I am going to work with records from the SalesLT.Product table. So, I need to make sure that my backend contains the MS_TableSchema application setting with the SalesLT value there, and my Product.json file contains autoIncrement property in true due to integer primary key there.
But there is one more problem: as we discussed in the first post, Azure Mobile Apps (node.js) service requires id name for the primary key rather than ProductID. In general, it’s not easy to change any column name, and even in our simplest case, we cannot do it using just sp_rename. You will be able to see that the database contains lots of dependencies to ProductID. So, I would recommend to create a new view rather than redesign the whole database. We will be able to work with the view like with the table, and we will be able to define new names for our columns.
CREATE VIEW [SalesLT].[vProductList]
WITH SCHEMABINDING
AS
SELECT
p.[ProductID] as id,
p.[Name],
. . . . .
p.version,
p.createdAt,
p.updatedAt,
p.deleted
FROM [SalesLT].[Product] p
Prior to create the view, you have to make sure that SalesLT.Product already contains version,createdAt, updatedAt and deleted columns. You can simply create Product.json and Product.js in your backend environment to force the framework to create these columns for you and after that you can rename Product.js and Product.json to vProductList. Once you finish, you will be able to use Easy Tables functionality and review your data in the portal:

Of course, if you create any additional column in the view, you will fail because views don’t allow you to alter associated tables.
Let’s go back to our Xamarin application and implement something simple.
I will not implement a really perfect MVVM approach, but we will need to create some classes in any case. First of all, we need to create a class that will represent our table. It’s exactly a model and we will implement all needed properties there. You can manage name-column relationships using attributes, but if you use identical to your db names in your class, you have to do almost nothing. So, you can find my class below:
You can see that I used vProductList as a class name and Id, Name, ProductNumber, Color and Size are my columns from the table.
Now, we need to implement a view-model class that will prepare all data to show UI. I am going to use an ObservableCollection to store our items to make sure that our UI will be updated automatically in the case of new items there. I am using the singleton approach to make sure that we have just one view-model in time and I will implement the Product class that will satisfy our needs better, compare to our vProductList. Of course, the Product class doesn’t have any specific things now, but later we will be able to add some UI-related features to it.
You can see that we use MobileServiceClient class to get a reference to our service, and once we need some data, I am using ToListAsync to download everything. At the same time you can find that I am using a strange property RecordCounts. It’s still not clear why I need it, but later we will be able to see why it’s important if you want to show all data from your table.
Let’s implement our UI:
You can see that there is a ListView that just displays Id and Name fields from the table. Additionally, there is a label that shows number of records that we just downloaded.
Below you can find associated with the UI code:
We are just getting a reference to our view-model and download data once our UI is appearing.
Let’s start our application and you will be able to see that the UI displays just 50 records:

It’s happened because node.js implementation doesn’t allow you to get all records. By default, you can get just 50 records, but there is the pageSize parameter that you can provide in your app.js file.

In any case, if you change the parameter, you will be able to download fixed number of records only. That’s why we need to implement something on the client side to display everything.
In order to do it we can use ItemAppearing event handler for our ListView. The ItemAppearing event fires for every item before it will be displayed. We cannot guarantee exactly when, be it will fire in advance. So, we can use this event to download more and more records, implementing some sort of lazy loading approach. Just look at the following code:
protected async void ListView_ItemsAppearing(object sender, ItemVisibilityEventArgs e)
{
var itemTypeObject = e.Item as Product;
if (model.Items.Last() == itemTypeObject)
{
await model.LoadDataAsync();
}
}
You can see that if ItemAppearing fires for the last element in the list, we will be able to download more. The most important thing there that if ListView implements RecycleElement caching strategy, we will download more elements just if a user scrolls the list far enough.
If you run the application, you will be able to see that there 100 or 150 records in the list (depends on your monitor and other parameters), but once you start scrolling down, the list will download more and more items (by 50 records in our case).
So, now you know how to deal with big table and aware about “50 records” limit. Next time we will discuss how to implement continues integration with GitHub.
How to cook Azure Mobile Apps (node.js): Xamarin and .NET Standard
In the previous post we discussed how to setup Mobile Apps in node.js, and it’s time to start developing a simple client application. I will use Xamarin and C# programming language, because Xamarin is the coolest technology right now that allows me to develop applications for all modern devices.
My application is not very complex, so, I will use Xamarin forms to develop it just once for all platforms not digging to any platform specific features.
You can create your application on Mac or Windows using Visual Studio for Mac or Visual Studio 2017 (2015). In my case I am sitting at Kelowna airport with my Windows computer, so, I will use Visual Studio 2017 Update 3.
Pay attention that Visual Studio allows you to create Xamarin Forms application using Shared Project or PCL templates. It’s strange, but Shared Project is the default option, and I would like to recommend changing it to PCL. Later, you will be able to use .NET Standard rather than PCL just moving your code to a .NET Standard library project.

Visual Studio creates 4 projects in one solution and three of these projects contain platform-specific code for supported platforms (iOS, Android and UWP), but the last one is exactly Xamarin.Forms based portable class library. Almost all time we will work with this library, but on the first step we need to add a reference to Mobile Apps SDK for each of our projects. Therefore, I would recommend to select Manage NuGet Packages for the solution rather than for a particular project and find Microsoft.Azure.Mobile.Client library:

The process is not complicated, but there is a surprise: we will not be able to install the latest version of the library exactly to Xamarin.Forms project:
![]()
The latest version supports .NET Standard (at least 1.4) and we can easy add it to our Android, iOS or UWP applications (because Xamarin added support for it some time ago), but you cannot add it to your PCL (Xamarin.Forms part). Of course, you can say that I could avoid this problem using Shared Project approach. Yes, I could do it as well as I could create lots of “spaghetti” #if #else code and got a problem with IntelliSense and so on, but I want to stay with “a separate library” approach and there are several ways to fix the problem:
· I will start with some suicidal ways like: you can use REST API directly. It’s really great way to increase your income if anybody pays you for number of code lines, but in my case, it’s not true;
· Some guys like to recommend using the previous version of the library. Talking about “previous” they tell about 3.0.1 that was published couple versions ago. I am not sure what there is changed since 3.0.1, but I believe that they didn’t publish new couple versions “just because”. That’s why I would not recommend using this approach as well;
· Finally, you can migrate your library to .NET Standard;
Let’s stay with the last approach and see, how we can make the migration.
It’s funny, but you could do the migration process just clicking a button. Using Visual Studio 2017 Update 3 I could not find any button. If you visit PCL project settings, you still will be able to select a profile for PCL and you will see a message about .NET Standard benefits, but the button is disappeared. Probably, it was a reason to do that. At the same time, I am sure that yesterday I could see the button in Visual Studio for Mac.

Because we don’t have any button, we need to create one more project based on .NET Standard library template manually:

Opening project settings you can select any .NET Standard version for the project. Just pay attention that Visual Studio 2017 Update 3 will not install .NET Standard 2.0 automatically and you will need to install it manually from Microsoft web site, but Update 4 installer should include 2.0 version.

But don’t be in a hurry because .NET Standard 2.0 is just released, and it will be supported by Xamarin in next major update only. In fact, the problem even is not Xamarin, but in UWP platform that works based .NET Standard 1.4. You can find this information looking at the following page: https://docs.microsoft.com/en-us/dotnet/standard/net-standard

Microsoft is going to support .NET Framework 2.0 for UWP projects since Fall Creators Update, but it doesn’t mean that you will be able to target .NET Standard 2.0 and earlier UWP releases at the same time.
Therefore, if you want to avoid any previews, alfas and insider releases at this time, you need to stay with .NET Standard 1.4, at least for next couple months.
Once the project is created, we can move all our files from Xamarin.Forms PCL project to .NET Standard library project and remove initial Class1.cs. Thanks to Galaxy you can use Drag and Drop to copy all your files and folders. So, if you already have lots of files in the PCL, it should not be challenging.
Now, it’s time to remove your PCL, and you can rename your .NET Standard library using “old” PCL name. It will not help you to avoid problems with dependencies for your iOS, Android and UWP projects, and you should target your .net standard library from each of them.
The last thing that we need to do is adding reference to Microsoft.Azure.Mobile.Client and Xamarin.Forms libraries. The first package will not generate any problems this time, but I cannot say the same about the second one. Xamarin.Forms 2.3.4 still is not .NET Standard library.
Of course, the next release (2.3.5) already supports .NET Standard, but it’s still in preview. At the same time, if you want to test new features, you can check “Include prereleases” box in NuGet package manager and use a prerelease for 2.3.5 or even 2.4.0.

Both releases support .NET Standard, but the second one supports even .NET Standard 2.0. But if you want to use .NET Standard 2.0 for all projects, including UWP, you will need to install Visual Studio 2017 Update 4 Preview, the latest Windows 10 Insider Preview and the latest UWP SDK insider preview. I can use both options on my computer, but today we are working with components that are in production right now. So, we need to think about how to use the current Xamarin.Forms release.
It’s not the biggest problem because .NET Standard supports type forwarding and other stuff to target old libraries and we can use Xamarin.Forms, but we need to make some modifications in our project file: just open your .csproj for editing and add <PackageTargetFallback>portable-net45+win8+wpa81+wp8</PackageTargetFallback> right after TargetFramework:
![]()
It will tell the compiler that if it cannot add a reference due to a problem with the target platform, it’s OK and it should be ignored.
That’s all. Now, we can recompile our solution and even start initial projects using real devices or emulators.
Of course, once a new version of Xamarin.Forms is released, we will be able to use it as a .NET Standard library, but the previous approach will work fine for any other PCL assembly. Counting that there are huge number of existing PCLs, it’s important to know how to use them.
One more thing. If you still targeting Silverlight (WP) using Xamarin, you may need to add a special library to enable compatibility for it:

Next time we are going to start using our Mobile Apps and we will discuss lazy loading and 50 records limit.
How to cook Mobile Apps (node.js): table schemas, primary keys and existing tables
In this post I am going to discuss how to start developing a Xamarin client application that should be connected to an existing database. As a backend I am going to use Azure Mobile Apps, because the service can minimize our work on server side and provides lots of useful features. But to get all benefits from the service, you need to know some tricks that it’s not easy to find in standard tutorials.
Today, I am going to discuss, how to use Mobile Apps in the case if you already have a database. Yes, Mobile App allows you to create a database from scratch using a graphical interface, but usually it’s not the case. I participated in lots of projects last year, and we always had a database in advance or designed it a few days before any client application. I know, it can hurt some client developers, but in many cases Xamarin app is not the centerpiece of your project.
Before to create any database, I want to note couple things.
First, you can develop your code for Mobile Apps in JavaScript or in C#. I like C# and don’t like JavaScript, but in the case of JavaScript/node.js implementation, you should do/know almost nothing to implement your backend. In the case of C#, you will need to generate lots of code, know Entity Framework details, and Azure Portal will provide limited number of features. In fact, C# and node.js implementations are fully different and if I don’t need to create a complex enterprise application I will always select node.js. If you want to use C# rather than JavaScript, this post will not be useful for you at all.
Second, Microsoft still supports an old implementation of the mobile backend called Azure Mobile Service. It’s not available in the new Azure portal, but there are still lots of content about it. I found that some developers continue to use Mobile Service term and it generates some messy. Try to use Mobile App everywhere. It’s the latest implementation under Azure App Service umbrella.
Ok. Let’s try to create a new database using SQL Azure. In order to have some tables and data, I would recommend selecting AdventureWorkLT database. It’s possible to do from the Azure portal. So, you can simple select New->Databases->SQL Database, and you will be able to select the database from the “select source” field in the wizard:

Once you create your database, add a firewall rule to connect it from your SQL Management Studio or Visual Studio, you can note two things there:
-
There are several schemas rather than just dbo one. It’s very important, because dbo is the default schema in Mobile Apps, and if we want to get some data from SalesLT.Product table, we have to deal with SalesLT schema;

-
You can note that all tables contain primary keys of the int data type. In the case of the Product table we have ProductID as the key. It’s a very important note because some people likes to tell that you have to use guid as a data type for keys. I don’t think so, but we even should not discuss this question since we ALREADY HAVE a database that was designed by Microsoft as an example. I just want to connect my Xamarin app to it.

That’s all with the database and now we can create an instance of Mobile App:

It’s a trivial task and you should not select any specific parameters on this step.
Once you have your database and an instance of Mobile App, you can connect it together. To do it, you need to open Data Connections tab from the Mobile App dashboard and add a new connection:

Azure portal is clever enough to list your database. So, you should not provide any connection strings manually. You can see that a default name for the connection string is MS_TableConnectionString. DON’T TOUCH IT! Exactly this name is hardcoded in many places.
In fact, using Add data connection tab, you are creating a new connection string that is available from the Application Settings tab. Therefore, Data Connections tab is just an easier way to create MS_TableConnectionString parameter, but you can use Application Settings as well and we are going to use this tab for some additional parameters:

Now, it’s time to select a programming language. In the case of C#, you can close the portal and just create all code in Visual Studio, but in our case, we want to use the portal and node.js. So, we have to initialize our empty hosting space with the right environment. It’s possible to do if you select Easy Tables tab:

Just click Initialize App and all needed components will be installed to your hosting space. Now, Easy Tables tab allows you to create new tables in the existing database and you can note that it doesn’t display our existing tables. Let’s try to understand, how to show our SalesLT.Product table in the list. To do it, I will just create a new table and check what is happening with my hosting space:

To create a new table, you can provide a table name and some security parameters for different operations with the table.
Now, you can use Mobile App dashboard to open App Service Editor to review all available code in your hosting space:

You can see that for our faketable we have two files faketable.js and faketable.json. The first file imports azure-mobile-apps module and creates a table object, and the second one contains some parameters for the table:
{
"softDelete" : true,
"autoIncrement": false,
"insert": {
"access": "anonymous"
},
"update": {
"access": "authenticated"
},
"delete": {
"access": "anonymous"
},
"read": {
"access": "anonymous"
},
"undelete": {
"access": "anonymous"
}}
Both files contain important information for our research. Now, we can see that there is a module that contains implementation for the backend, and if we check the module, we can find it on github: https://github.com/Azure/azure-mobile-apps-node. So, node.js implementation for Azure Mobile Apps IS IN OPEN-SOURCE. It’s great because we can find some answers there. The second file allows us to tune the backend behavior a little bit providing some parameters per table.
In fact, in order to connect a table to our service from our database, we need to create these two files. Let’s make the experiment and create product.json and product.js files with the same content as faketable.js and faketable.json. Of course, if you go back to Easy Table, you will not be able to see any Product table due to some problems. In order to understand all these problems let’s look at faketable structure:

You can see that the backend created five columns for the table and the table was created in the dbo schema. So, to make our table available we have to manage several things:
-
Table schema
-
Additional columns
-
Primary key that is GUID rather than int
In the case of columns createdAt, updatedAt, version and deleted you should nor care too much. Once we fix all other problems, the framework will add all columns automatically and we will not loose our existing data. Of course, if you suddenly have some columns with the same names, you are in trouble, but it’s a very rare case.
Let’s fix the table schema. In our case we have SalesLT rather than dbo. To understand how to change the table schema for all tables, I would recommend to open node.js implementation on github: https://github.com/Azure/azure-mobile-apps-node. You can open environment.js in src/configuration/from subfolder and check all available parameters there. One of the parameters is MS_TableSchema that you can provide from the Application Settings tab on Azure portal.
* @param {string} MS_TableSchema Default schema name for sql tables. Can override in table config

Therefore, we can specify SalesLT schema for the project.
Now, you should be able to see Product table in the list, but it will not work due to the problem with the key. By default the key is GUID, but in our case it’s int and we are not going to change it because it will lead to huge amount of problems. In fact, Mobile Apps allow us to use int, but we need to configure it. In order to understand where to make all needed changes, I would recommend to check /src/data/mssql/statements/createTable.js on github. There is some code:
pkType = tableConfig.autoIncrement ? 'INT' :
It’s just the beginning of the line, but you can see that this line is setting up the primary key type. It’s clear that it will be int if autoIncrement property from Product.json is true.
Therefore, we fixed almost all problems, but we still have one left: the primary key MUST have “id” name. If you open src/data/mssql/statements/insert.js on github, you can find something like this:
sql += util.format('SELECT * FROM %s WHERE [id] = SCOPE_IDENTITY()', tableName);
You can see that id is hardcoded inside the query. I really don’t know why it was implemented in this way, but it’s something that you cannot modify it in any config file. Of course, it’s possible to assign own commands, but I am not sure if you want to implement own data provider. Additionally, it’s possible to modify existing code and redeploy it, but it’s not easy as well. The fastest way to fix the problem, it’s renaming our ProductId to id:
EXEC sp_rename 'SalesLT.Product.ProductID', 'id', 'COLUMN';
It’s not the best way, because you have to check all your stored procedures, modules and other client applications. So, it will not work in enterprise.
Now you can use Easy Tables to see all data, and all additional columns will be created.
That’s all for today and next time we will discuss how to develop a basic Xamarin application, but there are still some things to research, which you can do yourselves: find a way to work with app.js in order to use more parameters (including schema); try to understand if it’s possible to modify table schema per table (schema parameter in table config file); how to modify the code to use any primary key name.
Playing casino with government or my message to Justin Trudeau
Hi Justin,
My name is Sergii Baidachnyi, and I live in Canada for almost three years. I was relocated inside my company from Ukraine, and I am trying to be Canadian since that time. I always follow all Canadian rules and regulations, and pay taxes from my world-wide income even if I am getting my income not in Canada. In fact, I like Canada, and I thought of Canada as of my new home.
I didn’t vote for you, because I don’t have this privilege yet, but I voted for you in my heart, since you promised transparent government, clear processes and equal opportunities for everyone despite their status. Therefore, I was waiting for Canada Day as a special day to celebrate 150 years of diversity, innovation and community, and I could not imagine that I would be forced to celebrate it in the USA due to such a strange and complex discrimination that didn’t allow to get a short-term visa for my minor daughter who wanted to spend her summer vacation with me in Canada.
My 13-years old daughter, Mariia, legally lives in the USA with her mother, who is getting PhD in Purdue University. She worked hard this year, so we thought that spending her summer in Vancouver would be a good idea. We would visit lakes for fishing, u-pick raspberry on local farms, hiking, cycling, take private ballet lessons in Vancouver ballet and so on. In February, we requested a new foreign passport from Ukraine to avoid any problems with expiration dates, updated her I-20 form and, finally, at the end of May we filled our application for a visitor visa. Of course, we submitted all requested documents and I had explained that my daughter could have been a part of my PR application or could have had a student permit by law when I moved to Canada in 2014, but I didn’t ask for anything like this because she is going to spend a couple more years in the USA.
Everything looked good and system confirmed a few times that once any additional documents are required, they would be requested:

And here:
![]()
The processing time to receive Canadian visa from the USA is 21 days, but it was manageable.
You may be surprised, but there is no way to call to New York office (where her documents were processed), there is just a web form, and even the call center cannot answer anything about visa processes there (after 40 minutes waiting on the line). So after 21 days have passed, and I did not get any reply about her documents, I contacted Canadian visa center through the web form, explaining that my daughter has to go back to school in the beginning of August and we would be happy to get the visa before this time. The answer that I got from the government was useless:

It looks like an automatic reply about nothing. Pay attention that at the same time I emailed to the USA consulate in Vancouver about extending her F-2 visa to the US (after all, we found that we don’t need it to go back to the USA), and you can compare how many details the answer of the American officials has compared to the answer from the Canadian government (including many ways to contact them):

Finally, in 30 days after application was submitted we got a standard message that our visa application is refused:

Of course, my first question was: Is it a casino? You have to put some money into the system, click a button and see if you win. I answered all questions, provided all the requested documents, and the system has been telling me all the time that everything was OK, and should some additional documents be needed they would be requested. But the visa was refused without attempts to request these documents, any replies to my inquiries, and after more than 4 weeks of processing time!
I cannot explain it at all. Should I assume that a person in the New York office is discriminating people by status or nationality? If it’s true, I would like to know if it’s an official government position? Probably, they need to reach some internal KPIs (like number of refused applications) or the process is simply broken. In this case we cannot talk about clear processes at all. It’s even not about why Donald Trump’s administration thinks that my daughter may attend the US school, but the Canadian government has an opposite opinion about her legal presence in the USA (not even Canada). It’s exactly about the absence of the clear processes and transparent government, because there is no way to make government employees be responsible for their discriminating decisions.
You can invest huge amount of money to IT infrastructure, but it’s really not helpful, because a person in the New York office will waste all this investment being is too lazy to find an attached I-20 form (which was attached to the application in our case) or request any additional documents that system hadn’t ask before – it’s much easier to click ‘refuse’ and request one more application (and make people wait another 30 days plus collect additional processing fee).
You know, last year I participated in some projects to make Canadians’ lives better and safer. We developed a software solution to help people manage after global disasters, we worked on a solution for a better environment for people with disabilities, etc. So, if you need my help to develop a bot that will be able to improve the process, just let me know.
In two hours after our visa was refused I opened the Twitter and found this message:

I really wanted to recommend Canada as a host for all International events, but I have mixed feelings now. I don’t want people to go through the same nightmare with irresponsible government officials that I did. I still hope that my issue is not related to Canada in general, and it’s just New York office’s mistake. But my daughter’s vacation is ruined anyway.
Of course, I resubmitted the application, paid the fee again, attached a huge amount of additional documents to my case, but Mariia will not need any visas in 30 days because she will start her classes at the US school. I filled out one more web form asking them to speed-up the process, but there is no much faith any person reads those or cares. This time I didn’t even receive an auto reply. That’s why I am in the USA right now and I am spending my Canadian money here to grow their economy.
Best regards,
Sergii
UWP: Working with Bluetooth (part 5: Bluetooth RFCOMM)
Windows 10 API supports not just Bluetooth Low Energy devices, but allows you to utilize RFCOMM protocol as the most widespread since Bluetooth invention. Even if your module doesn’t support BLE, you always can use RFCOMM. As in the case of BLE Windows 10 allows you to publish RFCOMM services or work with other services as a client.
I decided to implement client only, and for a server I used a cheap Bluetooth module HC-06. It’s possible to buy the module for couple dollars and you can find lots of videos and examples about how to connect it to Arduino board. But you can use any available Bluetooth module. Just in case you can find a schema below:

My module wasn’t on a plate with a voltage regulator. So, I decided to add a voltage divider for TX->RX connection, because Arduino generate 5 volts there rather than 3.3 volts. If you have a module like on the schema above (with the regulator), you still can use the divider, and it will not break your circuit.
To communicate with the module from Arduino, you can simply use the serial port. So, I connected TX and RX pins on Arduino to RX and TX pins on the module. Additionally, I connected 3.3V and GRN on Arduino to VCC and GRN on the module.
I setup my module to use 115200 speed and changed the name of the module to rfcommhc06. You can do it connection the module to your computer using USB to Serial adapter and execute some AT commands (AT+NAMErfcommhc06 and AT+BAUD8).
Finally, I could implement a very simple code for Arduino:
void setup()
{
Serial.begin(115200);
pinMode(13,OUTPUT);
}
byte blue;
void loop()
{
if(Serial.available())
{
blue=Serial.read();
Serial.write(blue);
if (blue==3)
{
digitalWrite(13,HIGH);
}
else if(blue==2)
{
digitalWrite(13,LOW);
}
Serial.write(blue);
}
}
This code read data from serial port using infinity loop and one there is 3, it sends high voltage to pin number 13. In the case if 2 is in the stream, it sends low voltage to pin 13. Because pin 13 are connected with a LED on Arduino Uno boards, the led will switch status between on and off depends on input data. At the end of each iteration, I send all incoming data back.
If you finish your circuit and deploy the code successfully, it’s time to start developing a client for Windows 10.
The first part of our code will look similar to BLE example. We have to start watcher and declare handlers for Added and Removed events:
DeviceWatcher deviceWatcher;
DataWriter tx;
DataReader rx;
StreamSocket stream;
protected override void OnNavigatedTo(NavigationEventArgs e)
{
deviceWatcher = DeviceInformation.CreateWatcher(
"System.ItemNameDisplay:~~\"rfcommhc\"",
null,
DeviceInformationKind.AssociationEndpoint);
deviceWatcher.Added += DeviceWatcher_Added;
deviceWatcher.Removed += DeviceWatcher_Removed;
deviceWatcher.Start();
base.OnNavigatedTo(e);
}
The DeviceWatcher_Added method will looks different compare to BLE example.
private async void DeviceWatcher_Added(DeviceWatcher sender,
DeviceInformation args)
{
var device = await BluetoothDevice.FromIdAsync(args.Id);
var services = await device.GetRfcommServicesAsync();
if (services.Services.Count>0)
{
var service = services.Services[0];
stream = new StreamSocket();
await stream.ConnectAsync(service.ConnectionHostName,
service.ConnectionServiceName);
rx = new DataReader(stream.InputStream);
tx = new DataWriter(stream.OutputStream);
await this.Dispatcher.RunAsync(
Windows.UI.Core.CoreDispatcherPriority.Normal,
() => { switchLed.IsEnabled = true; });
deviceWatcher.Stop();
}
}
First, we use the BluetoothDevice class rather than BluetoothLEDevice. Once we have a reference to the device, the GetRfcommServiceAsync method helps us to get list of all available services. Our Arduino code is very primitive and we have just one service. Once we have a reference to the service, we can use the StreamSocket class to establish a connection to the Bluetooth module and get references to input and output streams.
Finally, we can use DataReader and DataWriter classes to start working with the module like with a virtual serial port:
private async void ToggleSwitch_Toggled(object sender, RoutedEventArgs e)
{
byte data = 2;
if (switchLed.IsOn)
{
data = 3;
}
tx.WriteByte(data);
await tx.StoreAsync();
uint buf;
buf = await rx.LoadAsync(1);
var symbol = rx.ReadByte();
Debug.WriteLine(data);
}
If you want to develop something more for Arduino and Windows 10, I would recommend to use Remote Wiring project (https://github.com/ms-iot/remote-wiring) that can help you control Arduino board using your own UWP application.
UWP: Working with Bluetooth (part 4: Publishing GATT services)
Thanks to new Bluetooth Low Energy API in Creators Update, UWP applications can publish GATT services playing a virtual peripheral role. It makes sense if you develop a hardware hub on Windows 10 that should be connected to different peripheral devices (not just Bluetooth, but ZigBee, Z-WAVE and even by wires) and want to use Bluetooth as a communication protocol between your phones, computers and the hub. In this case, the hub can read data from the peripheral devices and route these data as a set of Bluetooth services.
Of course, to publish anything as a BLE service you have to make sure that a radio module on your computer supports peripheral role. I didn’t find any list or recommendations yet, but it’s really not easy to find a device for tests. Even if a radio module based on a chip that can work as a transmitter, it means nothing. All my five computers including Surface Book don’t support peripheral role, but I could find at least one device: Raspberry Pi 3 that has embedded Bluetooth module. It’s strange, but using Raspberry Pi 3 you will not be able to implement beacons, but it works fine as a virtual peripheral device. If you have Raspberry Pi 2, it will not work, because both recommended external modules don’t support peripheral role.
To check if your computer supports the peripheral role, you can use the BluetoothAdapter class and check the IsPeripheralRoleSupported property. If it’s true, your device can work as a Bluetooth peripheral device.
Let’s discuss how to publish own services if your module supports the peripheral role. I will create a service that is similar to STEVAL-IDB007V1 default service that we discussed in the beginning. So, I am going to create two services. The first one will publish acceleration data and the second one will publish temperature and pressure. First of all we need to create an instance of the GattServiceProvider class. It’s possible to do using the CreateAsync static method of the class:
var serviceResult =
await GattServiceProvider.CreateAsync(Guid.Parse(SensorUUIDs.UUID_ACC_SERV));
accService = serviceResult.ServiceProvider;
accService.AdvertisementStatusChanged += AccService_AdvertisementStatusChanged;
You can see that to use the CreateAsync method it’s enough to pass a GUID as a parameter. Pay attention that Bluetooth specification contains some reserved GUIDs for adopted services. So, if you create something from scratch, it’s better to check all reserved GUIDs. In the code above I declared an event handler for the AdvertisementStatusChanged event in order to make sure that my service is started.
Once our service is created, we can add characteristics to it. The following code shows how to do it:
var param = new GattLocalCharacteristicParameters();
param.CharacteristicProperties =
GattCharacteristicProperties.Indicate |
GattCharacteristicProperties.Read;
param.WriteProtectionLevel = GattProtectionLevel.Plain;
param.UserDescription = "accelerometer";
var charResult=
await accService.Service.CreateCharacteristicAsync(
Guid.Parse(SensorUUIDs.UUID_ACC_DATA),param);
accData = charResult.Characteristic;
accData.ReadRequested += AccData_ReadRequested;
To create a characteristic, you can use CreateCharacteristicAsync method, but prior to call it we need to prepare parameters for the characteristic. You can see that our characteristic is indicatable and supports Read operation. You can add Notify to support notification mechanism. Because our characteristic supports Read, we need to handle ReadRequested event to provide all needed data. Below you can see implementation for the handler:
private async void AccData_ReadRequested(GattLocalCharacteristic sender,
GattReadRequestedEventArgs args)
{
var deferral=args.GetDeferral();
var request = await args.GetRequestAsync();
var writer = new DataWriter();
writer.WriteBytes(new byte[6] { 0x12, 0x12, 0x12, 0x12, 0x12, 0x12 });
request.RespondWithValue(writer.DetachBuffer());
deferral.Complete();
}
In this code if you forget to use deferral, the code will generate a runtime exception. In the beginning if the chapter my STEVAL-IDB007V1 board had some sensors, but Raspberry Pi 3 doesn’t contain accelerometer or temperature sensors. So, I generate fake values just to test if it works at all, but if you want, you can connect real sensors to your Raspberry Pi 3.
Finally, we are ready to advertise the service.
accService.StartAdvertising(
new GattServiceProviderAdvertisingParameters() {
IsDiscoverable = true, IsConnectable = true });
Using StartAdvertising method we need to initialize IsDiscoverable and IsConnectable to true.
Opening my code on github you can find implementation for the second service with similar implementation. To test this service, we can use our first application in this chapter or any BLE scanner.
UWP: Working with Bluetooth (part 3: Advertisement)
Bluetooth Low Energy can be used to implement beacons. Usually beacons are not designed for pairing and simply broadcast data making them available for everybody. You can use beacons in a mall to notify shoppers about some deals, or in quests, notifying players about some treasures in the area, or even for people with disabilities notifying them about surrounding environment. Today, almost all mobile devices support Bluetooth Low Energy and advertisement feature there and you even can find some SDKs for Android and iOS that implement own data payload specifications (Eddystone and iBeacon) based on Bluetooth Low Energy Advertisement. Thanks to the specifications you can understand what kind of data is broadcasting and use them in your applications even if a beacon was implemented by somebody else.
In the case of Universal Windows Platform you have access to a special namespace Windows.Devices.Bluetooth.Advertisement that can help you receive and send data using BLE Advertisement. Using this namespace you can implement classes that will use existing payload specifications or simply broadcast data in your own way.
To implement advertisement example, I am not going to use any microcontroller. Instead, I would recommend to use just Windows 10 computers. In general, any Windows 10 computer can send and receive advertisement, but in some cases, it’s not true and some Bluetooth radio adapters don’t support broadcasting advertisement data.
To understand if your adapter supports broadcasting, you can simply execute the following line of code:
BluetoothAdapter adapter = await BluetoothAdapter.GetDefaultAsync();
And just check adapter’s property using Debugger:

You can see that there is a property IsAdvertisementOffloadSupported that shows if your adapter can broadcast advertisement. In my case this property is true.
Ok, let’s start with code that broadcast some data:
BluetoothLEAdvertisementPublisher publisher;
protected async override void OnNavigatedTo(NavigationEventArgs e)
{
var manufacturerData =
new BluetoothLEManufacturerData();
var writer = new DataWriter();
writer.WriteString("Buy our socks for a dollar");
manufacturerData.CompanyId = 0xFFFE;
manufacturerData.Data = writer.DetachBuffer();
publisher =
new BluetoothLEAdvertisementPublisher();
publisher.Advertisement.ManufacturerData.Add(manufacturerData);
publisher.StatusChanged += Publisher_StatusChanged;
publisher.Start();
base.OnNavigatedTo(e);
}
private void Publisher_StatusChanged(BluetoothLEAdvertisementPublisher sender,
BluetoothLEAdvertisementPublisherStatusChangedEventArgs args)
{
Debug.WriteLine(args.Status.ToString());
}
In our case we made all preparation work using the BluetoothLEManufacturerData class. We used this class just in order to simplify our work, because we are not going to broadcast anything special, but in the most cases you will use the DataSections property rather than the ManufacturerData property. Exactly DataSections contains all payloads and filling ManufacturerData you automatically add a section to DataSections collection. But working with the BluetoothLEAdvertisementDataSection class to fill DataSections is a little bit more complicated, because you need to know different data types from BLE specification, form a header that will include special flags and size of the buffer and so on. In the case of the BluetoothLEManufacturerData class you can write your data directly and all what you need is just provide a company id. Using this link (https://www.bluetooth.com/specifications/assigned-numbers/company-identifiers), you can find some hardcoded company ids for companies like Apple and Microsoft. Therefore, I selected the first available ID from the end. Additionally, I implemented the StatusChanged event handler to make sure that my application starts broadcasting data.
Therefore, we have a publisher that broadcasts a text message. Now, we can create a watcher that will receive our advertisement. Let’s look at the following code:
private BluetoothLEAdvertisementWatcher watcher;
protected override void OnNavigatedTo(NavigationEventArgs e)
{
watcher = new BluetoothLEAdvertisementWatcher();
watcher.SignalStrengthFilter.InRangeThresholdInDBm = -70;
var manufacturerData =
new BluetoothLEManufacturerData();
manufacturerData.CompanyId = 0xFFFE;
watcher.AdvertisementFilter.Advertisement.ManufacturerData.Add(
manufacturerData);
watcher.Stopped += Watcher_Stopped;
watcher.Received += Watcher_Received;
watcher.Start();
base.OnNavigatedTo(e);
}
private void Watcher_Stopped(BluetoothLEAdvertisementWatcher sender,
BluetoothLEAdvertisementWatcherStoppedEventArgs args)
{ }
private void Watcher_Received(BluetoothLEAdvertisementWatcher sender,
BluetoothLEAdvertisementReceivedEventArgs args)
{
Debug.WriteLine(args.Advertisement.LocalName);
Debug.Write(args.RawSignalStrengthInDBm);
if ((args.Advertisement.ManufacturerData.Count>0))
{
DataReader data =
DataReader.FromBuffer(args.Advertisement.ManufacturerData[0].Data);
Debug.Write(data.ReadString(
args.Advertisement.ManufacturerData[0].Data.Length));
}
}
protected override void OnNavigatedFrom(NavigationEventArgs e)
{
watcher.Stop();
base.OnNavigatedFrom(e);
}
In fact, it’s not a complex task to create a watcher, but implementing your own application, you should not always watch all advertisements around. It’s better to watch exactly beacons that were designed for your application. That’s why the BluetoothLEAdvertisementWatcher class allows us to setup filters. In our case we have two filters: signal strength and company id. It can help us understand that we are too close to the beacon and that it’s exactly our service.
Working with beacons we have to note several things:
- In most cases you will work with the DataSections property. So, if you want to develop something cool, you have to learn Bluetooth LE Advertisement specification. Additionally, you may need to implement Eddystone and iBeacon specifications;
- You can see that beacon broadcasts the same data all time and if you run our application in the Debug mode, you will be able to see that the application prints advertisement message all time. So, it’s important to check if you already received the message to avoid duplicate actions;
- Above we implemented just foreground applications, but it’s not wisely. Probably, our application will not stay open all time even in the case of watcher. In the case of publisher, there is no sense to implement interface at all. That’s why it’s important to know how to work with Bluetooth in background. We will discuss background approach later;